Version control is one of those weird, geeky things that never really gained much ground in non-geek fields, despite the fact that it’s blindingly useful. Even educational institutions (at least the ones I’ve been able to observe) seem to prefer to omit so much as a mention of it in their technical courses. I can’t really give a reason for this, but it does at least give me the excuse to write a post about version control and kick it off with a rant.
So what’s this version control thing?
Version control (or source control) is nothing more arcane than keeping copies of your work as you make changes to it. On the surface, it’s all straight-forward; make a copy of every file you have before you make any changes to it. That way, if you seriously mess up, you can always fall back to something that worked before, or at least compare your broken copy with one that used to work so you can figure out where it went off kilter. Your client wants the image he told you to throw away two days ago? No problemo – out comes the backup. Accidentally deleted half your thesis and closed the word processor? No problem – out comes the backup.
Now, in the real world, it’s not so easy. Unless you have an iron will, a black belt in filing, and a zen-like ability to name files in a sensible way, you’ll be swamped with a huge number of backups with similar looking names. Something that’s impossibly difficult to find, might as well not exist at all. We want to get the goodies, but really need to keep all those backups out of our way. Luckily there are like, loads of version control systems out there to do the heavy lifting for you.
The rest of this post will be about how to set up a version control system for a single user. We’ll use Subversion, because it’s free, works great, and because I like it. Since we want to keep things as slick as possible, we’re not going to use raw Subversion though – we’re going to use TortoiseSVN, which is also free, also works great, and has nice coloured icons to boot. This neat tool lets you do most of the stuff you want Subversion for, but it lets you do it from Windows Explorer, rather than the command line.
Getting started
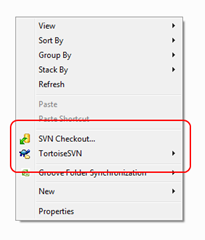
You will obviously need to download and install TortoiseSVN first. Once that’s out of the way, you should notice that your Windows Explorer context menu now has two new options:
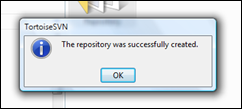
We’ll get to them soon. Now, find a place to create your repository in. The repository is the place where Subversion will store all the information about your files. I went ahead and created a folder called “Repository” in my C: drive. To create a repository, right click the folder, and select “Create repository here” from the “TortoiseSVN” submenu. One brief popup later…
And that’s it. You only need to do this once, since you’ll be using the same repository for your various projects. Which brings us neatly to…
Adding a project to the repository
Let’s assume you’re a really organized person, and that all the files related to one project are in the same folder. In this example we’ll use a simple web page, but it can really be any file, or group of files. You could, for example, store a word document, and some related spreadsheets in the same way. You could even store individual files, but unless that file is a project in itself (for example, a really complex illustrator masterpiece), you’re better off storing it with related material.
You can import that folder into the repository right away, and that will work fine in most cases. However, you’ll have problems later on if you want to use tagging and branching, which we will look at in a little bit and are really rather useful. Instead, this is the way I usually set up my projects. It’s not all that much extra work; just create three subfolders in your project folder, and put your files into one of them. In the picture below, my project is called “My cool project”, and I’ve created the folders “work”, “branch”, and “releases”. All the files I had went into the “work” folder.
Incidentally, you can name the folders anything you like, as long as they make sense to you. In this case, I’m using “work” for work in progress – this is where I’ll be doing stuff. The “branch” folder will be used to hold branches (no, seriously) that I may need to make from time to time. More on that soon. The “releases” folder will be used to store the versions I will be – you guessed it – releasing. That way, I will know that whatever happens to my web server, I can always pull out a copy of the page from source control and restore it.
Note: The conventional names for these folders are “trunk”, “branches” and “tags” respectively.
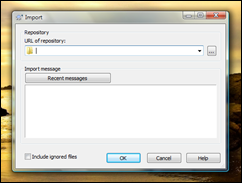
That’s all the setup there is. Now, to add the project: right click the “My cool project” folder, and select “Import”, again from the TortoiseSVN menu. You should get the TortoiseSVN dialog:
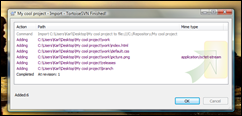
Hit the ellipsis button (the one with three dots on it) and select the repository folder we created earlier (c:\repository). The box under “URL of repository” should now say something like “file:///C:/Repository”. That’s the repository selected. Now, you’ll probably want to keep your projects separate, so add the name of your project after that, like “file:///C:/Repository/My cool project”, and hit “Ok”. TortoiseSVN should show you the files it has added:
Hit ok, and you’re set. Congratulations, you’ve imported your first project. You’ll probably want to work on it next.
Getting your project back out
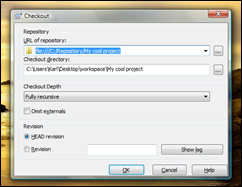
The folder we just imported doesn’t get wired up to the version control system automatically, so what we do is, create a new folder, and check out a copy of our project. We don’t need the original anymore, and we can safely delete it to get rid of some clutter. To check out your project, right click your newly created folder, and click “SVN Checkout”. This will give you the checkout dialog:
You can click ok right away, and you’ll get all three folders you originally checked in. Alternatively, you can just click the ellipsis next to the “URL of the repository” box, and select the “work” subfolder from the repository explorer. You can always do this to check out specific files or folders you want, without having to check out the entire project.
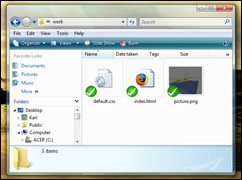
When you check out something from the repository, your files and folders will be marked with a nice big icon, easily visible in windows explorer:
The green icon tells you that the file has not been changed since you got it out of the repository. If we modify one of the files…
We get another icon that reminds us that the file has not been checked in yet. To set this right, right click on the folder, and select “Commit”. This tells tortoise that we’re happy with the changes we made, and want to keep them. You can also right click the individual files, but I find that committing at a project level is a better practice to get into. It lets you commit a number of files in one go, which makes groups of changes easier to keep track of.
The commit dialog also allows you to enter a note, which you can use when you’re trying to remember when you did what.
Oops, I did it again…
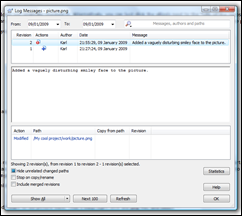
Suppose that in a couple of days I change my mind and I want to old picture back. That’s easy: right click the png file, and select “Show log” from the TortoiseSVN menu. You can now select a version from the log screen (below) and revert to it by right clicking and selecting “Revert to this revision”. In my case, I select revision 1, which is the last (well… only) version before I made the change.
If you have not yet committed a file, and want to cancel all the changes since the last commit, you can also use the “Revert …” item in the TortoiseSVN menu.
Adding files
If you add a new file or folder to your project, it will not have a status marker, because Subversion doesn’t know about it yet. To add it to source control, select “Add” from the … you guessed it … TortoiseSVN menu. You can also do this to a folder, in which case you can add groups of files.
Note: Just because you added a file, it doesn’t mean it’s committed yet. The file will only be copied when you first commit it.
… and removing them again
Since Subversion keeps track of your files even if you delete them from windows explorer, deleting files does not get rid of files in the repository. If you delete a file as you normally would, the file will still exist, and will be included in the project if you check out or export the project. To remove a file so that it will not be included in future, use the “Delete” item in the TortoiseSVN menu.
Note: Delete does not affect versions retroactively, so if you delete a file in, say, version 5, the file will still exist if you check out versions 1 – 4. This is awesome for retrieving files you thought you wouldn’t need, and lets you keep your working folder clean with much less trouble.
Tagging along
While keeping track of every single change is good, there are usually milestones in a project that you want to keep track of separately. While working on a design for example, you might want to keep track of each version which you presented to your client. If you’re working on a software product, you definitely want to keep track of every release. In Subversion, we can do this by creating a tag.
Tags are snapshots of a project at a given point in time. When you create a tag, you are creating a copy of the project that should never, ever be changed. This way, you can track the state of the project over its lifetime.
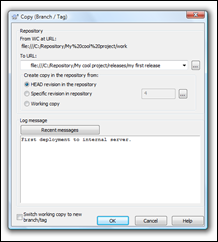
To create a tag, click “Branch/Tag” in the context menu and enter a subfolder of the “releases” folder (“tags”, if you’re following the standard naming convention), and click ok:
Make sure that the “Create copy in the repository from” radio button is set to “HEAD revision in the repository”, otherwise you may be missing some of your latest changes. Also, make sure that the checkbox marked “Switch working copy to the new branch/tag” is not checked. Checking this box means that any subsequent commits would be saved in the tag, defeating the purpose entirely.
Branching ways
Branches are mainly used to allow collaborators on a single project to experiment or make breaking changes without affecting other contributors. As such, they are beyond the scope of this post, which is to set up a repository for a single user. Creating a branch is the same as creating a tag; however, you should use the “branch” subfolder instead, and check “Switch working copy to the new branch/tag”.
Exporting projects
At some point, you will want to do something with your files, and that usually involves moving them off your PC in some way; uploading them to a server, or emailing them to someone. Now, Subversion writes a hidden folder in each folder in your project, to help it keep track of your files. While these files are initially small, they tend to grow quite large on extended projects or deep and twisted folder structures. To help package your files more neatly, you should “Export” the project into a separate folder (one that does not contain Subversion information) and upload, zip, or otherwise transfer that, instead of your working folder. Exporting is similar to Checking out, but does not add version control information to the folders.
And that’s all for now
This is not a complete Subversion tutorial, nor is it intended to be. At best, it’s a rough set of notes of how I use a version control system when I’m working on my personal projects, when I’m working alone. Old hands will no doubt notice that some critical features, such as updates and merging, are not mentioned. This is intentional; I don’t find them useful in a one man team. For a more comprehensive look at Subversion, I recommend a good look at Version Control With Subversion, which is freely available online.

